Strategy Guide, eh?


Ha! Bet you thought I couldn't spell "strategy!"


Levels (demo only):


Level 0: '74 Jailbreak

Map Design: The Bad Man

Ah, only the first level and you're already stuck! Heh. Cool. Anyway...the level starts off with the player facing the wall when the prison door unexpectedly opens up. The sparking noise can only mean one thing...it's a jailbreak! Simply put, the best thing to do is just punch any pfhor you see. Use your fellow jailbreakers to take bullets for you once the drones arrive. Then head downstairs...

 
...you'll have to take the west door to continue as the east one is "locked." Inside are a bunch of holograms of BOBs and a planet. Ignore them and kill the pfhor (they're quite real). There's a terminal at the west end of the room. Walk over to it. Reading the text would be good, but just make sure to hit the button, get some life, and pick up the gun and ammo that teleports in. On your way out, make sure to hit one of the pattern buffers...
...now you come to a general theme of the level: hit the two switches then move on. Do this to get past ALL of these areas. Watch out for the hunters, Caliburn doesn't know what he's talking about. Run back to get life and save a couple times if you get too hurt...

...these two rooms are unimportant, run past them (hint: killing the hunters inside and searching the rooms out south then north will reward you).
...go in this closet first. More life, ammo, and a save point. Caliburn fills you in on the above area. Here's the best plan: walking up to the top step activates the monsters inside so just walk up there then back up a lot and the troopers will grenade the people who come after you. Once no one else is coming, walk up to the door aiming slightly upward and start shooting after opening the door. If your sights are misaligned, quickly close the door and wait until the troopers stop grenading it. Then try again. The terminal ahead has a Neuralizer and ammo with more information. It then teleports you...

..into immediate danger! Run around frantically to avoid the enforcer gunfire. Take them out then head downstairs. Punch-i-size anyone IN YOUR WAY to get to the life and save point. After doing those two, MOVE ON. This is a big help, people, as Caliburn has instructed you to do more than is necessary. Head upstairs then hit the elevator down...
...if you are playing on Ritchie Blackmore or easier, take Caliburn's advice and go AROUND the way out. If you are playing Eddie Van Halen or harder, it might be more prudent to go straight for it. The "proper usage" of the Neuralizer Caliburn refers to means its charging function: it kills the cyborgs in one hit. Watch out for the big explosion of its detonation (on Eddie Van Halen+, they might take more to kill and once active they are a BITCH to kill!). Do the hiding behind the screen thing Caliburn described to kill everyone inside. Watch your radar for when the guards find their way to you. Once you've killed enough of the enforcers (all?), head back in and read the terminal. You're done!


Level 1: Metapfhorically speaking...

Map Design: Confusitron

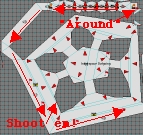
This level, I think, is a toughie. You start off facing a switch and you'll soon realize that you have triple shields and more ammo and an AR. Hit the switch. If you get get annoyed by the alarm, hit the switch again, it 
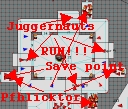
won't stop the process it begins. Once you can, RUN! Get to the walls and hide from the FOUR Juggernauts that fly into the previous area. In doing so, scouts will teleport in and start fighting. Try to stay away from them, they are clumsy as HELL. Also, you'll notice doors will soon open all around you. These don't provide you with a way out but rather fill the room with Pfhlicktor. It is my belief that this onslaught of enemies is impossible to endure on Yngwie Malmsteen mode. You Vidmasters can take that 
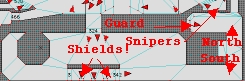
as a challenge! Anyway...at some point, another door will open on the south side letting in some guards, troopers, and a sniper. Save, then go through the door they came from...
...it's a good idea to kill anyone you see heading into the next area. Failing to do so will result in being surrounded eventually. Jump down the "pit" and then down one of the sides. You'll need to pick up a chip down there so look out for that. This area is REALLY close quarters with those ever-so-strong pfhlicktor so be careful. You're supposed to read the terminals, but just walk in front of each of them, 
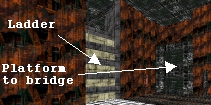
it'll have the same effect. Head back up one of the sides, then take the "ladder" to get back to the chip insertion. 
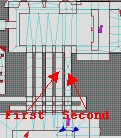
Go back down (east side will probably be easier) to get another chip. Watch out for more pfhlicktor. Head back up again using the east side platform this time. The ladder is now blocked so you'll have to jump off the platform to get on the bridge. Head south on the bridge and get the second chip insertion. Continue on...

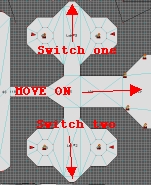
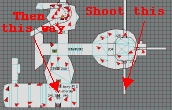
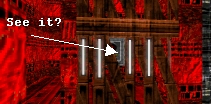
...kill all the punks that teleport in. Hit THIS set of wires. Move on, kill people who come in, then wait for the multiple doors to finish opening. Go inside and up the platform. Open the panel on the south side and fire a grenade or charged fission blast all the way down to hit the wires in the BACK. Then go back down the platform, being wary of the people who teleport in, but also enjoying the cool light show and dismantling of the world around you. Go down the broken "bulk lorry..."
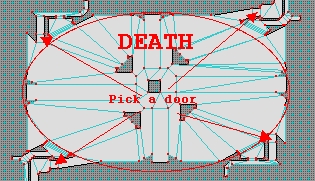
...the next area is shrouded in darkness so once you step inside, run out and "Rambo-trap" the people who come out. Find the stairs upward and fall down the pit at its end. Run to the light as it will be hard to fight the pfhlicktor at the bottom in the dark. Hit the save. The next area can be a pain. The best way to handle it is to kill ALL the monsters affecting the area THEN hit the wires on the south side of the pillar and run for high ground...

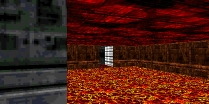
...don't jump into the lava room with the arrows first, that's a bloody trick! Instead, go into the one CLOSEST to it and swim east. A platform will lift you out of the lava, but not out of danger. The room it leads into will fill up with guards and troopers once you step inside. Go through the portal, hit the switch, then head back through the SAME SIDE you came through to get a triple shield power up. Go back into the lava, then swim up the shaft closest to you and out of the lava. There should be another triple shield power up waiting for you nearby. Get it and follow the arrows. You'll notice the room now has enough lava to swim up to the near ledge rather than frog blast. In successfully doing so, Caliburn rewards you with more ammo and a double life power up. Fall down the adjacent pit...
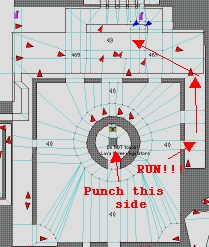
...there'll be a switch down there, hit it. Be patient, however, this is a lock. The purpose of this (and many of the lava areas) is to kill anyone who shouldn't be here as anyone who should be here should be able to teleport around as the pfhor do. Anyway, destroying the levee controls a couple of rooms ago caused the lava in here to filter out so 
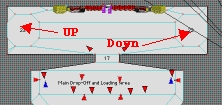
you won't die. Moving on....kill everyone you see, head down 
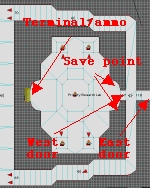
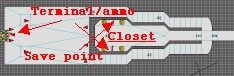
the west hall first (or maybe later) to get a triple life power 
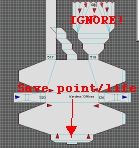
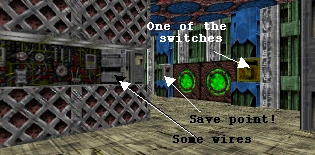
up. The east hall leads to a sort of maze that once you've found your way out, is a save point. See it in the picture? You CAN hit this even though it kinda seems impossible. Go through the next hall to...

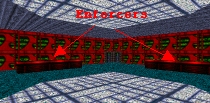
...a room which a Juggernaut, some pfhlicktor, and two scouts teleport into to have a big shoot out. Carefully end this fight then figure out the canal-like lock system. Hitting 
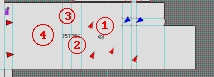
the switch will activate a series of events:

1. Lava filters IN to here.

2.This platform lowers to the ground.

3.This platform raises up (try to be ON or at least beyond this when this happens!).

4.Lava filters IN to here.

Then you can swim up, get the life, through the hall on the south wall (killing pfhlicktor and such in the way) and into a big room...

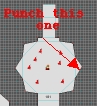
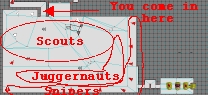
...where two Juggernauts, a bunch of snipers, and several scouts teleport into to have a final, climatic battle. A good battle plan is to try and eliminate a bunch of the snipers quickly. They distract the scouts from the Juggernauts which they can kill relatively quickly. Hit the switch on the south wall to activate a slow lift to cross the lava with, then head to the terminal, get the ammo and get outta there!


Level 2: Wait for the Ricochet

Map Design: The Bad Man

Alright, I'm gonna try to keep this short as since the level is radial, you basically have one mission to carry out then you do it until it's done. Anyway....the level starts with a blitzkrieg: you, a few drones, and some marines land on a loading area and kill the opposition waiting there. Once inside the building, your surviving helper marines and drones teleport out. Walk up to the terminal to get some life, ammo, and a spay shooter. Careful with that thing, I cannot stress enough how easy it is to kill yourself with it. The order which you do the next parts is up to you, but I suggest you move "up" first...
...clear out the cyborgs and guards. Then break the wires to activate the switches. One switch opens the door to the "tunnel" across to the other sides. The other closes the sniper windows and opens the doors leading to their rooms. They will already be angry at you having heard the gunfire through the walls. Kill them. After doing this once, I think it's a good idea to save (and save CONSTANTLY) and then head back down the platform back to where you were and then go "down..."

...go north first and kill the guard. Hit the switch and anger two more snipers. Kill them. Then go to the south area. The guards are easy to kill but the enforcers can be a pain. Also, hunters will randomly teleport in. Clearing this area grants you access to double life panels! Use them whenever necessary. Now- this is really up to you- I suggest heading all the way back "up" and (saving again is good) use the tunnels by hitting the switches on the pillar in the middle (watch out for guards and a swarm of "hyper" guards!) and hit each of the other three sides in the same fashion. The level is quite symmetrical. Of course, you actually DO have to kill each and every monster in this level, as it is "extermination." Once you've cleared all four sides, pick a side and go down to the bottom. Hit the switch next to the life and head into the area it opens up. ...
...head into the "core" to hit the four switches. These are guarded by cyborgs and you will once again be swarmed with hyper guards. A good strategy is to run in, run out, and fill the room with shrapnel. Watch your sides for enforcers. The switches activate the doors leading to the final fight...

...bravely go though one of these doors. The huge (Moo crashing) room has dozens of pfhlicktor and "super" pfhlicktor in it. Marines will teleport onto some vantage points and provide you with rocket launcher and napalm thrower cover. Try to maximize the use of your spay shooter(s) here. Live through the fight then head back to any one of the terminals. If Caliburn is satisfied that all enemies have been destroyed he'll teleport you out. Congratulations! You beat the demo!